domingo, 17 de abril de 2011

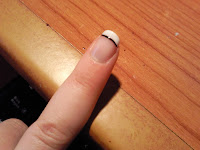
Manicura francesa con lacitos (Nivel Fácil) / French manicure with black ribbon


La manicura francesa es siempre la mejor apuesta en caso de duda para decorar las uñas. Es fácil de hacer, resulta muy elegante y crea un efecto de mayor longitud a las uñas cortas.
Si te gusta mucho este estilo de manicura, y quieres darle un toque original, puedes probar con pequeños lacitos en la zona blanca.


Estos lacitos son muy sencillos y muy rápidos de hacer, sólo necesitas un esmalte del color que prefieras y un pincel fino.
Te recomiendo que si te gustan los diseños de fantasía, te hagas con un pincel de este tipo, o con esmaltes en los que vengan ya incorporados como brocha. Como verás, los uso mucho en mis diseños, ya que resultas tremendamente útiles a la hora de realizar dibujos con precisión. Además, no suelen ser muy caros.


The french manicure is always the better option if you have doubt about how to paint your nails. It's easy, chic and makes your nails looks longer. If you like this manicure, and want give it a special touch, you can try small ribbons too.
This ribbons are really easy and fast, and you only need a classic french manicure kit, blach polish and a small brush.


I recommend you that, if you like this kind of desings, look for a brush like that. You can give it many uses, it has great accuracy and it isn't expensive.

Para comenzar, pinta tus uñas de manicura francesa. Para este diseño, es necesario que aunque tengas las uñas cortas, la línea blanca sea un poco ancha, para que el dibujo del lacito quepa bien.


To start, paint your nails with a french manicure. Although you have shorts nails, you need make the white zone a little wide, so the ribbons fits well.


Cuando hayas realizado la línea blanca, es el momento de dibujar el lazo. Primero perfila la parte inferior de la línea blanca, de lado a lado de la uña. 


Now let's paint the ribbon. Outline the white band with black polish, from side to side like that:


Ahora, para crear los pliegues puedes hacerlo de dos formas: o bien haces dos pequeños puntos uno al lado del otro (recomendado si no tienes mucha práctica), o haces dos círculos huecos (para este necesitarás más pulso). 

Then, to do the ribbon folds you have two ways: make two points together (if you haven't much practice) or two circles (you will need a good  pulse).


Por último, haz dos pequeñas tiras de tela en el lado contrario del lazo, y habrás acabado el dibujo.


Finally, makes two curved strokes on the opposite side, and you have finished the desing.


Termina los dos pasos de la manicura francesa que quedan (esmalte rosado y brillo protector) y ¡ya tienes tus uñas listas!


Apply the rest of the french manicure kit (pink and top coat) and here you are your nails!


Mariposa (Nivel Medio) / How to do a butterfly in your nails

Ahora que se acerca la primavera, podemos experimentar con nuestras uñas y ponerlas a juego con esta estación. Y el dibujo de la mariposa es una opción bastante buena en este caso.
Dibujar una mariposa básica es más sencillo de lo que parece. Para hacerla necesitaremos esmalte negro y un pincel fino, además de los colores para rellenarla, que pueden ser los que tú prefieras.


Now that the spring is near, we can try news designs, more fun and colorful. The butterfly is a perfect option in this case.
Draw a butterfly in the nails is easier than you maybe think. To do it, you will need black polish and a small brush, a choose some colors for trimming too.

Comenzamos como siempre usando una base protectora. Luego puedes dejar de fondo el color natural de la uña (como en mi ejemplo), o bien aplicar una base de color lisa o en degradado, y dejar que se seque.
Para comenzar la mariposa, usa el esmalte negro y haz un trazo recto, que será el cuerpo de la mariposa. Luego en la parte superior, haz un pequeño punto, que será la cabeza. Debe quedarte un dibujo en forma de i. 

We're going to start using a base coat. Later, you can leave the bottom of the nails colorless, or apply a base polish. Also you can do a degradé
To start the butterfly, use the black polish and do a straight line. That will be the body of the butterfly. Then, do a dot above the line, it will be the head. You must have a draw like a "i".


Ahora vamos con las alas. Dibuja, un poco más arriba de la mitad del trazo central, dos líneas, una a cada lado. Procura que se inclinen de forma ascendente, pero que sean ligeramente curvadas hacia abajo.
Ahora, desde la punta de estas líneas, comienza un nuevo trazo hacia abajo, también un poco curvado, cuyo final esté en la mitad del cuerpo de la mariposa.

Let's go with the wings now. Do two strokes on each side of the body, in ascending but a little curved. Now, from the tip of these strokes, do the same again, but this time down. You must finish at the middle of the body.


Ya tenemos las alas superiores. Para las alas inferiores, repite el proceso anterior, solo que esta vez haz los trazos más pequeños y apuntando hacia abajo, comenzando desde la mitad del cuerpo de la mariposa.

To do the lower wings, repeat the process, but this time do smaller strokes and pointing downwards, starting from the middle of the butterfly.


Ahora tienes el “esqueleto” de la mariposa. Puedes dejarla así, pero te recomiendo que la colorees por dentro, así ganará en detalle y vistosidad.
Puedes probar a usar un solo color o varios, por ejemplo:
Con un pincel fino rellena el interior de las alas, y déjalo secar. Luego, coloca una gota de esmalte de otro color en la zona interna del ala, y con un palillo arrástralo suavemente hasta la punta de la misma. Este proceso es igual que el que enseñé en el diseño de flores básicas.

Now you have the basic form of a butterfly. You can leave it like that, but i recommend you fill it with colours. So it will look colorful.
You can use one or more colours, for example:
Take a brush and fill the wings with one color, and wait for dry it.  Then, put a dot, with other colour in the inner zone, and drag it with a toothpick, to the edge of the wing.
This way is the same as the basic flowers desing.


Si quieres que la mariposa aparezca de lado, empieza como en el ejemplo anterior, pero esta vez, dibuja solo las alas de un lado. Luego, un poco más abajo, dibuja parte de dos alas más, como si estuviesen más atrás. Para acabar, colorea su interior del mismo modo que en el primer caso.

If you want a sideway butterfly, start like the previous way, but this time draw oneside wings only. Then, draw others wings a little below. To the end, fill the draw like the first time.


Como toque final puedes decorar un poco más la mariposa con purpurina, trazos de esmalte plateado o dorado, flores alrededor…

You can trim a little more your desing, with glitter, glod or silver polish, flowers around...


Bueno, espero que os haya gustado este diseño. No olvidéis cubrirlo con brillo protector, y ¡disfrútalo!

Well, I hope you like this desing, don't forget apply a top coat! See you next time!